Showing posts with label Gumpaste. Show all posts

Thursday, July 14, 2011

My Little Model


So I've been working on my modeling skills ever since I attempted to make this pregnant lady who looked like she was having triplets. I just couldn't get her proportions right. I'm not gonna say she was fat, but.... yeah, ok, my first gumpaste model was fat. And the second one I did was just a head and a torso. She didn't even have arms or anything, since she was chillin in a bath tub (more about that cake later!!!), so this little lady (she needs a name! Anyone?) is figure attempt #3, and I'm getting better!!!


It helps that I found a mold at Michaels for $5 (with coupon). I do need to practice some more. Somehow her boobs turned out tiny (and when I attempted to make them more proportionate, they ended up huge instead. Oh, well...) and she's got these ginormous man hands and arms. Plus her feet were 2 different sizes. So that's what I've got to work on for my next piece.


Oh, and I've read from multiple sources now that figures are best modeled out of fondant (one website said Satin Ice was the best. I've only ever used Wilton & Fondarific so I couldn't tell you if that's true or not!) which would explain a lot, since my gumpaste always starts to wrinkle and crack before I'm done with it.


So for the next figure I make, I'm going to use fondant (probably mixed with a little gumpaste or some tylose powder), and I'm going to try to make her look like me, crazy pink/blue/purple hair and all! :)






Tuesday, July 12, 2011

Flowers & Cake Design (Part 1)


Well, I started my final Wilton class this past Monday. I'm a quarter of the way done with flowers & cake design and I'm actually really excited for this class. There's a lot of flowers that we'll be doing out of buttercream (or royal icing), and I never really got the hang of the piped flowers when I tried to teach myself. Hopefully I'll be a faster learner with an instructor who's going over the step by step instructions with me.


 This is the pansy that we made. I think this is actually upside down, but I don't really know. I like pansies a lot in real life (my grandma always plants tons of them) but I'm kind of iffy about this gumpaste one. First of all, the gumpaste started to harden and crack before I finished ruffling the petals, so that was a total buzzkill. I also feel like the sizing of the flower is off.


My biggest complaint about this class is that there is a lot of redundancy when you take the Flowers class and the Fondant class (weren't they supposed to fix that?). You even get a lot of the same tools. I'm quite miffed about that; I'd rather get some new tools that Wilton suggests you buy, but they don't actually put in your kit, like the 9" rolling pin or the tapered spatula.


You also have to re-learn a lot of the same skills: how to tint gumpaste, how to make gum-glue, etc. So totally boring if you've taken the gumpaste class already.


And the button flower? I've got mixed feelings about this guy. First of all: SUPER CUTE. I can't wait to use it with this mold for a cake I've been wanting to make for Katie for a couple of years now. But the way the flower cutter is set up is SUCH A PAIN. Also, I don't understand why you don't make this flower in the fondant/gumpaste class either. If anyone can figure that out for met, let me know!


Anyone else taken this class? Did you like it? Was it hard to make the "Wilton rose?" (I really hope I can finally master that elusive flower!)


Tuesday, July 5, 2011

Mums & Dasies


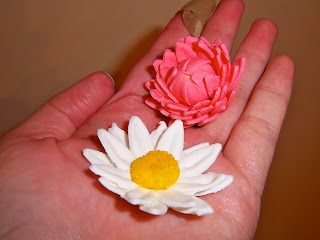
Kind of a weird picture of my hand at a weird angle, but here is some photographic evidence of the gumpaste flowers I made in the Wilton class.


Let me give you my personal opinion on these flowers, which you may or may not agree on...


The mum? It looks weird. I had no ideas what real mums looked like until my own mom showed me some in our front yard. They are weird looking (although tiny) flowers. I'm still convinced my mum looks like a pink artichoke.


Has anyone ever had a cake with mums on it, or made someone else a mum cake? Can anyone please give me some helpful hints to make this flower look better? Or maybe I should just write it off as one of those things I'll never be able to create.


The daisy was cute. I like how it has yellow sprinkles on it for the center, but I'm not a big fan of the Wilton daisy cutter. It doesn't give very clean lines. (I do like this other one, though.) The flower formers were nice, though!


So, out of all the flowers we made in the gumpaste class, the roses were my favorite, followed by the calla lily. The next flower I'd like to tackle is the tulip, which I have no idea how to do, so if you happen to stumble upon a tulip tutorial on youtube or something, send it to me!! They're my favorite flower, and I'd love to put them on a cake! :)


Also, Wilton is phasing out their old flower set for this new (and more expensive) one. I've got the old one, which I've really only used once, and I'm wondering if the new one is worth the extra tools. It's got dogwood and hydrangea and tiger lily cutters, all of which seems different and fun (but no daffodil or tulip cutters...not that I could figure out how to use then anyway, but still...). Then again, maybe I should just save up to get the higher quality (and also more expensive) metal cutters. Thoughts?


I wish they sold some (or all) of those cutters individually. For example, the large rose cutter. I'd like to get that one, because the cutter I got in my class kit only makes small roses. Then again, I could always buy the larger rose cutter at work. I'll probably end up doing that, and since I've worked with that one before, I know what I'm getting myself into!


Friday, July 1, 2011

Fondant Finale


So I don't know how this cake turned out so fabulous, but somehow, it did. This is the cake I made for my Wilton gumpaste/fondant class. I honestly don't know how it came together. The colors I chose based on the gumpaste and fondant I already had. I just mixed in a little extra color to make them brighter, and some how arrived at this pink/yellow/green scheme.


I've decided that the ruffle border we did in class that night is my new favorite. It looks really cute, and gives the cake a fabric-y look. And the daisies along the border? Ah! Not only did they hide the seams, but they just look like they belong there.


And the flower arrangement on the top was literally a last minute decision. My Wilton instructor and I were just playing around with the cake until it looked good, and this is what we got!


I'm so proud of this cake. Even though I stayed up too late to bake it, and got up too early to crumb coat it (and cut my finger in the process of leveling the cake-- ugh!), this cake is totally worth all the hard work! (Although if I had to do it again, I would be more careful with the knife! Kelsie, don't try to cut cakes before you've had breakfast!!)


Thursday, June 16, 2011

Pretty Little Flowers


So yesterday's Wilton class was awesome. I mean, just look at this gorgeous rose that I made! Having someone help me walk through all the steps was definitely a big help (especially compared with the roses I tried making on my own) and I remembered a lot of the advice Shelley gave during one of her demos last summer.


The key to realistic looking flowers, it turns out, is super thin gumpaste...


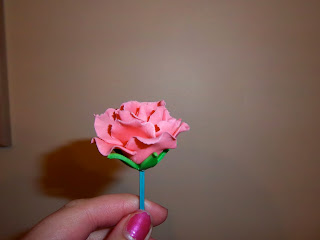
Maybe don't look at the carnation. The example our instructor showed us was much prettier/more life like. Mine just looks like wadded up tissues...


I just need more practice!


But the calla lilly is cute!


I love these flowers because they're so unusual :)


So that's what I did last night. I also talked myself out of buying a $130 airbrush machine that Duff offers... I'll wait until I have a 50% off coupon! Has anyone else bought this particular version before? Or even used an airbrush machine? I'd like to play around with the one at work, but I currently have zero experience airbrushing cakes. Any suggestions/anecdotes are welcome! :)